Presence Sensor
The LD2410 is a very well known and relatively inexpensive presence sensor.
Its speed, angle and capabilities make it a very versatile sensor. The main drawback is that it cannot be battery powered.
Thankfully we can power it via the main PCB. The sensor can be soldered on the main PCB.
GPIOs
The LD2410 is wired to the ESP32 using GPIO17(RX) and GPIO18(TX). Furthermore, GPIO16 can be used to cut power to the module.
Configuration
The most recent configuration yaml can be found in the esphome folder inside the repository. A known working configuration is the following:
# Configuration for LD2410 presence sencor.
# The sensor needs to be actively powered on to work. that is why GPIO16 is used for.
switch:
  - platform: gpio
    name: LD2410 Power
    id: ld2410_power
    pin:
      number: 16
      inverted: false
    restore_mode: ALWAYS_OFF

uart:
  - tx_pin: 17
    rx_pin: 18
    baud_rate: 256000
    parity: NONE
    stop_bits: 1
    id: ld2410_uart

ld2410:
  uart_id: ld2410_uart

binary_sensor:
  - platform: ld2410
    has_target:
      name: Presence
    has_moving_target:
      name: Moving Target
    has_still_target:
      name: Still Target

sensor:
  - platform: ld2410
    moving_distance:
      name : Moving Distance
    still_distance:
      name: Still Distance
    moving_energy:
      name: Move Energy
    still_energy:
      name: Still Energy
    detection_distance:
      name: Detection Distance
Drawbacks of slotting the LD2410
Unfortunately due to the size of the sensor and its high frequency of operation, the sensor could not be placed in a more convenient location.
Furthermore, due to height limitations in the current enclosure, you will need to print a 3d part to replace the original one.
The 3D part can be found in the 3d folder. This is the only replacement part needed to slot the LD2410 sensor.
LD2410 sensor soldering
Several iterations of the PCB were done to try to slot the LD2410 sensor without the need to change anything about the enclosure. Unfortunately, the sensor is too big to fit in the enclosure.
The best compromise was to have the sensor laying on top of the PCB. This way there is a semi-easy way to solder the LD2410 sensor.
To do that:
- place the sensor on the PCB.
- fill the pins with solder paste,
- use your hot air gun.
Testing with a multimeter
After soldering the sensor, it's a good idea to test it with a multimeter.
Testing continuity between the pins should give you a good idea if the sensor is soldered correctly. Just check out the following image.
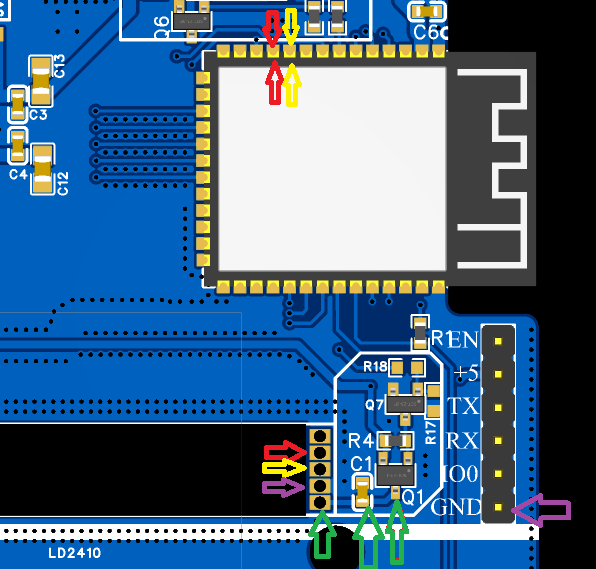
If you don't find continuity across the marked locations, then the sensor is not soldered correctly.
Accuracy behind the enclosure
The sensor is very accurate and can detect presence from a good distance. For sure there is a tradeoff when using the sensor behind a plastic enclosure. The sensor is not as accurate as it would be if it was placed in an open space. But in my non scientific tests, the sensor does still serve its purpose.